For outdoor adventurers, every climate poses unique clothing selection challenges that can make it difficult to stay comfortable during a full day outside. Here in the the Pacific Northwest the challenge is a steady pattern of moisture, combined with relatively warm temperatures. Even when it’s snowing it’s possible your skin can get wet. If you don’t manage the moisture you risk getting hypothermic, even when temperatures are in the 50s or 60s.
While some fundamental outdoor clothing truths apply no matter the climate, to make the most of the amazing outdoor spaces here in the PNW, it pays to put effort into figuring out clothing combinations that will keep you comfortable no matter what the atmosphere throws at you. Whether you are new to a particular sport, or new to the PNW, many folks’ initial clothing choices tend to be based on prior experiences that aren’t relevant.
Figuring out the clothing system that works for you can come with a sharp learning curve and plenty of uncomfortable days. No one wants to feel stoked when picking up backcountry ski rentals for the first time, only to be sweating buckets on the uphill climbs, and freezing on the rides down. Clothing that works fine for lift-aided skiing generally doesn’t work for the rigors of backcountry skiing.
Here’s a guide to help you select the best clothing for whatever adventure sports you may enjoy. We start with general principles, and then give you activity-specific recommendations.
The Basics of Layering
You might have heard the word “layering” being thrown around before. All that really means is creating a modular clothing system so that each item serves a specific purpose. Instead of having one big bulky coat that’s insulated and waterproof, layering involves having separate clothing components, like an outer shell jacket matched with wicking and insulating layers. This allows you to adapt to changing levels of activity and weather changes.
Most layering systems are built out from a base layer that’s worn next to your skin, one or two insulating layers, and a shell jacket on the outside.
Ever since cavemen started wearing animal skins, humans have had three main objectives with their clothing choices: stay warm, stay dry, and look good. That last goal is pretty personal, so we’ll focus on those first two: staying warm and staying dry. Each is comprised of few basic principles that you can adapt to your particular activities.

Staying Dry
In the PNW staying dry comes first and everything else follows. We experience two sources of problematic moisture: the elements and our bodies. The goal is to stay dry both on the inside and the outside. Remember, as you exert yourself your body sweats. Getting sopping wet from sweat will leave you just as sad and cold as getting soaked by a storm.
Sweat management is key. Your body sweats to cool down during strenuous activity, but if the moisture stays in the layers close to your skin too long, you may cool down too much, which in turn can make it hard to warm back up. For instance, even though cross-country skiing is a chilly winter activity, wearing a waterproof jacket that doesn’t “breathe” can cause you to get soaking wet from sweat. The solution is to wear a base layer that wicks moisture and enables it to evaporate quickly. Even if the temperatures are in the low 20s, when you are doing a strenuous activity, you might only need to wear a base layer and a fleece insulating layer. The best performing base layers are made of synthetics or merino wool. Synthetics can be more affordable, but have the tendency to smell like body odor if they aren’t properly washed. (Check out our tips on washing synthetic clothing.) Merino tends to be more expensive, but doesn’t get as smelly, and is touted as feeling warm even when it’s soaking wet.
The primary weapon to keep outside moisture out is a shell layer. A good shell layer will let sweaty moisture evaporate without letting the outside weather in. This should be a waterproof/resistant layer with a durable water repellent (“DWR”) coating. A waterproof membrane keeps water from soaking through, and the coating makes water bead up so it’s harder to penetrate into the fabric. During the summer this layer is usually a raincoat; in the fall and spring add rain pants; and in the winter it’s a ski jacket and pants or bibs.

If you are alternating between very strenuous and less strenuous movements, like riding, hiking, or climbing uphill followed by riding downhill, you’ll want to figure out how to efficiently add and subtract layers when you change modes of movement.
On the other hand, even when sea level temperatures are in the low 40s, it’s not uncommon for area runners to simply wear a tank top, arm warmers, and lightweight gloves.
Staying Warm
Once you’ve got your moisture controlled, it’s time to think about insulation. These middle layers trap air to help keep you warm. You have a lot of different options here, but the two primary ones are down and synthetic insulation. Synthetic insulation usually does a better job of keeping you warm even if it gets wet, so we recommend looking for that, or down insulation with a good waterproofing treatment. A soggy “puffy” will not keep you warm.
The key to staying warm in the PNW is staying dry as long as you can, and then making sure that your insulating layers still keep working when they inevitably get wet.
Layering for Cycling
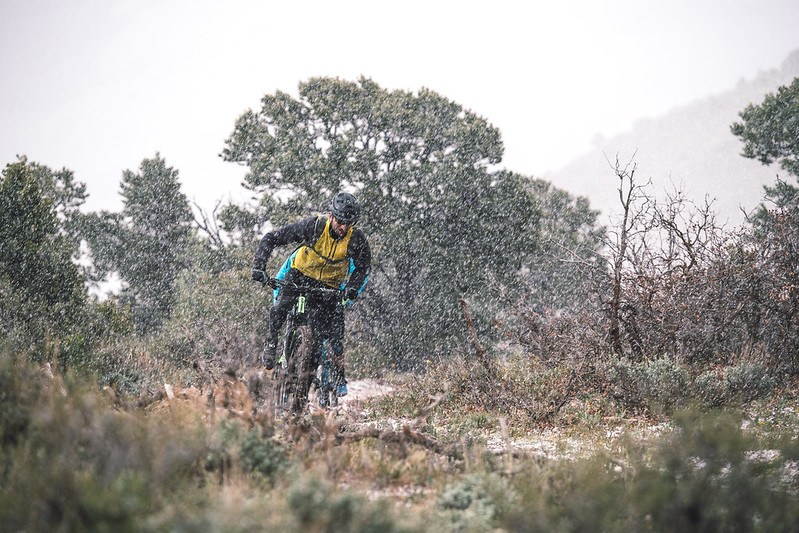
Fall and winter weather in the PNW may not be as perfect as our summer months, but that doesn’t scare people into stowing their wheels during the winter. Many still employ a bike as their primary mode of transportation, ride lower elevation trails for some wet winter mountain biking, or even participate in Washington Bikes’ annual Ride in the Rain Challenge. When you’re dressing before a cold ride keep the basics of layering in mind. Make sure your base layer wicks well and that you’ve got a waterproof shell. Seattle bike shops all have solid rain-specific gear selections. The techwear will often have a bike-specific fit, but the features will still work very well for hikes and other activities, or even just strolling around your neighborhood. While not at the top of mind for many people during the off-season, Black Friday mountain bike deals this time of year can be a great opportunity to find a few pieces to better round out a cycling layering system. In addition to proper layering, good bike fenders are your best friend and work wonders in keeping you dry in any setting.

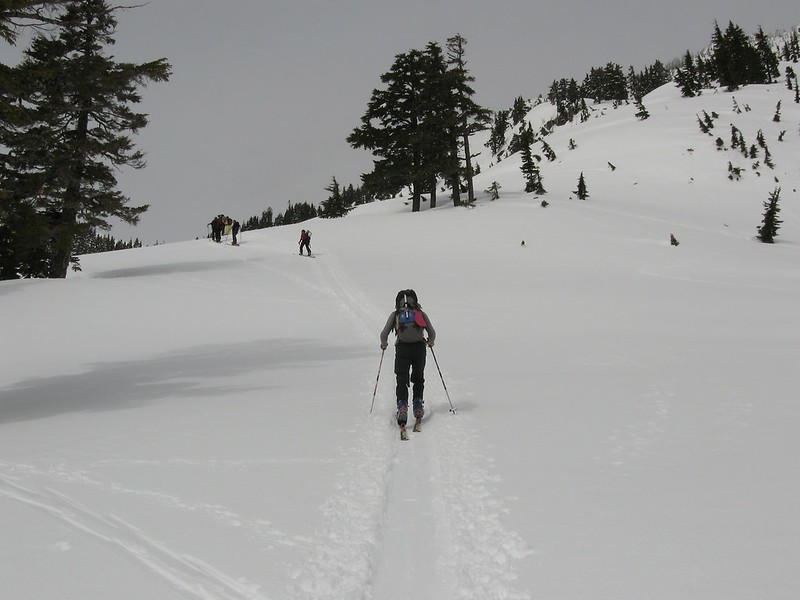
Layering for Snow Activities
Whether you’re skiing, snowshoeing, or winter hiking, your best resource is a good ski shop. The staff usually gets out to play whenever they can, and they have expertise based on personal experience. They can give you an idea of the range of gear you will need, and the layering that is appropriate for whatever you want to do outside. Find base layers that are comfortable and wick well, and look for a waterproof shell you can afford. Mid layers can be a little trickier to dial in, and it’s a good idea to experiment to figure out how cold you usually get in the winter.
For many of us, our wardrobes include a wide variety of puffys and fleeces of varying weights and materials so we can grab and go regardless of the weather.

For example, during a recent Turns All Year (TAY) clothing discussion on Facebook, ultra runner and backcountry skier Brad Hefta-Gaub gave these recommendations:
In general I’d recommend a kit that includes a couple of different types of layers and have them at the ready depending on the situation. I add on top of base layers. For me this means:
1. A soft shell/high activity mid layer. I prefer a layer that can act like a shell or a mid-layer, but can handle high output activities without losing its warming power. This means no down/puffy.
2. A hard shell/wind/rain snow is likely my outer layer. I can use it over just my base layer if it’s windy/rainy but warm and I’m moving or I can use it over my other layers if I’m cold. I have two versions of this. One is an “oh crap that’s not expected” version which I always have in my pack even if it’s a sunny day. No insulation on this layer–it’s a shell-only.
3. A puffy layer is for warmth only. This isn’t good for high-output activities. I have a couple different versions of this layer. One is expedition grade, another is lighter and more compact.
Thanks to Evo for co-producing this story.